When we met, Andrea was talking about her upcoming collection of patterns for men, called Woodsmoke & Ash, and I somehow convinced her that publishing a print book in addition to an ebook and individual patterns was a great idea. (Andrea, please forgive me if it was not a great idea.)
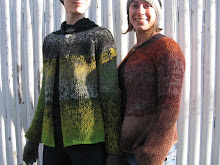
Now, with the copy I ordered sitting next to me (I LOVE PRINT BOOKS), I have the honor of hosting Andrea on her blog tour! My favorite design in the book is Plantago, a front-zip cardigan-jacket with a collar to die for, so I've asked her some questions about the collection in general and Plantago in particular.

Can you give me some background info about
Plantago?
This sweater was designed for my husband. Most of my samples live in plastic, but this one is actually his sweater. He's had it for over a year now and wears it on his outdoor adventures pretty regularly when it's chilly out, and he still loves it. He's really particular about these things, so it's satisfying to me that he's happy with it. I like it too, so I'm working on one for myself. I actually had yarn left over from the first one, so I just bought a few more skeins to make it enough to make my own. So, we're going to be really matchy-matchy, but we're just nerds enough to handle that.
[Ann's note: Wow, so your sweaters will be in the same color. It's a bold choice. Also, I was happy to see you wearing the samples from The Lenke Collection when we met and know that they get out of the plastic one in a while! They're great in the photos, but SO much greater in person.]

When I saw this jacket, I wanted it for myself!
Do you have any suggestions for modifying it to fit a woman?
Yes! I'm
working on one for myself, so let me share some thoughts about modifying it for
women and how I plan to modify it for myself.

Usually there are a few key differences between
sweaters designed for men and those designed for women.
The first is shaping. In order to have an attractive fit, a lot of
women's sweaters include waist shaping. However, unless you are very curvy (that is, there's a big difference between
your waist circumference and that of your hips and/or bust), I don't actually
think you'll need to add shaping to this sweater. Because it's worked all in 1x1 ribbing, the
sweater stretches beautifully to fit lots of shapes.
If you do want to add shaping, I suggest just
measuring the length from your hips (where you want the hem to fall) and the
smallest part of your waist. Cast on for
the size based on your bust circumference and work a decrease or two before you
reach that measurement. Since the gauge
is pretty huge (14 sts/15 rows = 4 in/10 cm in 1x1 rib), you won't need very
many decreases to create shaping. Once
the sweater has reached the length of the smallest part of your waist, work a
few increases before you reach the armholes to get the same number of stitches
that was originally cast on. Be sure to
maintain the ribbing pattern as much as possible during shaping. (The sleeve instructions include increasing
in pattern, so reading those instructions might be helpful.)
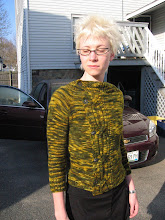
The second difference is sleeve length. I've found that I really like how the size
extra small fits me (though it isn't with negative ease, but actually about
5.75 in/14.5 cm of ease - my bust circumference is 31 in/79 cm), except that
the sleeves are much too long. On my own
sweater, I'll work the sleeves to about 17.5 in/44.5 cm instead of the
suggested 20 in/51 cm. Since the sleeve
shaping isn't spread out over the whole length of the sleeve, but finishes
about two-thirds of the way up, it's easy to work all the shaping and then just
stop when I've reached the length I want.

[Ann's note: If I ignore the ridiculous sleeves, this sample looks really good on you.]
The third difference is yoke depth. Usually women's raglan yoke sweaters have a
shallower yoke depth than the same chest/bust circumference sweater would have
on a man's sweater. For example, a
sweater with a chest circumference of 36.75 on a woman's sweater might have a
yoke depth of 8.5 or 9 in (these are just examples; depth can vary widely
depending on desired fit). Plantago
calls for a depth of 10.25 in for a sweater of the same chest
circumference. Like I said, I actually
really like the way the extra small size fits me, so I don't plan to make any
changes in yoke depth, but if I wanted a more fitted armhole, I would work a
few more every-row decreases than the pattern calls for in order to reach the
end of the yoke in fewer rows. Keep in
mind that shortening your yoke will also shorten your sleeve, so plan sleeve
length accordingly.
Who is that amazing-looking model?
That model is Rick. He worked with my husband in Seattle, and was
kind enough to model for me twice (see Scherer). He was a great sport getting up early and
driving with us from Seattle until we saw snow.
He makes a great woodsman, right? That's one fine beard.
[Ann's note: Yes, indeed. He's perfect.]

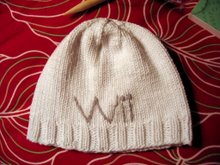
Any tips for setting in a zipper? Men love
zippers, and so do I, but I’m insecure about putting them in knitwear.
Zippers are extremely wearable, but they can be
a bit finicky to sew in. Here are some
thoughts on making your zipper experience more positive.
1. It's important to block the sweater and wait till it's completely dry before measuring for zipper length, as a washing can definitely change the overall length a bit. I actually ordered a custom zipper (waterproof from Zippersource.com) and when it arrived, it was too long. I'd measured while my sweater was still wet (I needed that zipper before the photo shoot!), and it shrunk up by at least an inch after it was actually dry. So, through some kind of engineering magic that I was barely a part of (thank you to my fella for that one!), we shortened it and it all worked out.
[Ann's note: I've found that guys are more motivated to help when the garment is for them.]
Ysolda Teague, in her book Little Red in the
City, recommends measuring the sweater on a model or mannequin to get the most
accurate measurement.
2. Zippersource is a great resource, but it can take time to source a custom zipper since the sweater is extra-long, so be sure to give yourself enough time if you're making it for a gift or with any kind of deadline.
3. Baste the fronts of your sweater together
before you do anything else. I recently
found this tutorial on using blocking wires to stabilize the whole thing and
I think I'll try that when I sew the zipper in my own sweater. It seems like a great idea.
Make sure that everything lines up perfectly,
then turn the sweater inside out. Pin
the zipper to the wrong side of the sweater, making sure that the back of the
zipper is facing you and the front of the zipper is facing the fabric. Then baste the zipper in. After basting, you can remove the pins. Turn it back right side out, remove the
basting thread keeping the fronts of your sweater together, and separate the
zipper, which will make sewing easier, especially with this fairly hefty
garment. I did this all by hand and
haven't tried it on a sewing machine, so I don't have recommendations for that,
but if you're sewing by hand, be sure to backstitch in the middle of the zipper
as well as whip stitching along the edge to keep it firmly in place. When you're done, remove your basting thread.
A few tutorials on putting zippers in hand
knits can be found here:
http://www.purlbee.com/zipper-tutorial/
Thanks, Andrea!
Now here's the exciting part: You can win a copy of Woodsmoke & Ash by commenting on this post!

All comments are welcome, but I would particularly appreciate suggestions for superbulky yarns I could use for my Plantago. The original uses Brown Sheep Burly Spun, which is a perfect outdoor man yarn, but I want something a little softer and, if possible, from an indie dyer. Any thoughts? I'm leaning toward a really dark, murky color of Malabrigo Rasta.
Congrats to Andrea on a HUGE accomplishment!